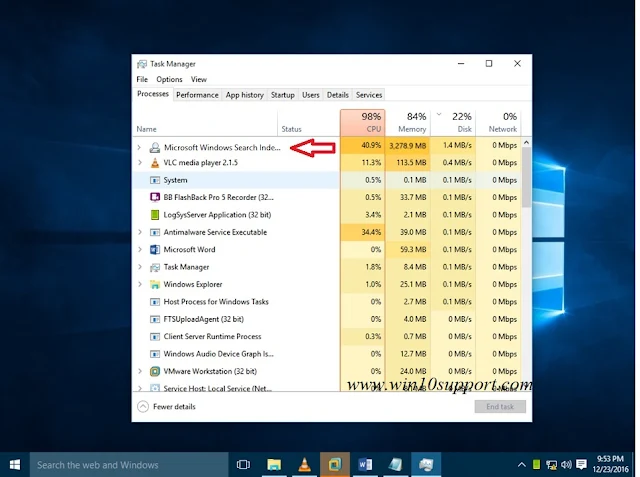
What Is This Process ( SearchIndexer.exe )
searchindexer.exe is built-in Windows service that handles indexing of your documents for the Windows Search, which sparks up the file search engine built into the Windows that powers all of the processes from Windows Explorer to Start Menu search box, including the Libraries feature too.
1. Restart the Windows Search Service
Sometimes, restarting the Windows Search service can resolve temporary issues causing high resource usage.
- Action:
- Press
Windows + Rto open the Run dialog. - Type
services.mscand press Enter to open the Services window. - Locate Windows Search in the list of services.
- Right-click on Windows Search and select Restart.
- Press
2. Rebuild the Search Index
If the index has become corrupted or is inefficient, rebuilding it may help reduce resource usage.
- Action:
- Open Control Panel.
- Go to Indexing Options.
- Click Advanced.
- Under the Index Settings tab, click Rebuild.
- Click OK to start the rebuild process. Note that this process may take some time depending on the number of files and size of your index.
3. Check for System Updates
Outdated system files or software can cause various issues, including high CPU and memory usage.
- Action:
- Go to Settings > Update & Security > Windows Update.
- Click Check for updates and install any available updates.
4. Exclude Certain Folders from Indexing
If certain folders are causing excessive indexing activity, you can exclude them from the index.
- Action:
- Open Control Panel.
- Go to Indexing Options.
- Click Modify.
- Uncheck the folders you want to exclude from indexing.
- Click OK to save your changes.
5. Adjust Indexing Options
Adjusting indexing options to limit what is indexed can help reduce resource usage.
- Action:
- Open Control Panel.
- Go to Indexing Options.
- Click Advanced.
- Under the File Types tab, you can choose which file types to index. Deselect file types you don’t need to search.
6. Check for Corrupted System Files
Corrupted system files can cause high resource usage. Running the System File Checker (SFC) and Deployment Imaging Service and Management Tool (DISM) can help repair these files.
- Action:
- Open Command Prompt as an administrator.
- Run the System File Checker:
sfc /scannow - After the scan completes, run the DISM tool:
DISM /Online /Cleanup-Image /RestoreHealth - Restart your computer after both scans are complete.
7. Check for Conflicting Software
Certain software applications, especially those that also handle file indexing or search, may conflict with Windows Search Indexer.
- Action:
- Open Task Manager by pressing
Ctrl + Shift + Esc. - Go to the Processes tab and look for any third-party applications that might be using significant resources.
- Consider disabling or uninstalling conflicting software to see if it affects the resource usage of the search indexer.
- Open Task Manager by pressing
8. Perform a Clean Boot
A clean boot helps identify if background programs or services are causing the issue.
- Action:
- Press
Windows + R, typemsconfig, and press Enter. - Go to the Services tab and check Hide all Microsoft services.
- Click Disable all to disable non-Microsoft services.
- Go to the Startup tab and click Open Task Manager.
- Disable all startup items.
- Restart your computer and observe if the resource usage issue persists.
- Press
9. Adjust Virtual Memory Settings
Incorrect virtual memory settings can sometimes affect system performance.
- Action:
- Open Control Panel.
- Go to System and Security > System.
- Click Advanced system settings.
- In the System Properties window, go to the Advanced tab.
- Click Settings under Performance.
- Go to the Advanced tab and click Change under Virtual memory.
- Adjust the settings or allow Windows to manage the virtual memory automatically.
10. Consider Disabling Windows Search Indexer
If none of the above solutions work and the high resource usage continues to be a problem, you can disable the Windows Search Indexer. Note that this will affect search performance.
- Action:
- Press
Windows + R, typeservices.msc, and press Enter. - Locate Windows Search in the list of services.
- Right-click on Windows Search and select Properties.
- Change the Startup type to Disabled.
- Click Stop to stop the service, then click OK to apply the changes.
- Press
High CPU and memory usage by Windows Search Indexer can disrupt your system's performance, but following these steps can help you manage and resolve the issue. Start with simpler solutions like restarting the service and rebuilding the index, then move on to more advanced troubleshooting if necessary. If the problem persists, disabling the service might be a viable option, though it will impact search functionality. Regular system maintenance and updates can help prevent these issues from recurring.

Comments
Post a Comment